Monday, June 27, 2011

A New Easel

I've been kept busy lately, upgrading my studio so that I could start doing portraits. One area in particular that I felt was lacking, was a nice studio easel that wasn't too unwieldy.

At first I browsed through the offerings in art supply catalogs, but ultimately decided to make one for myself. I had some scrap poplar sitting around that was intended for making artist panels, that didn't make the grade. While it isn't the best material for this purpose, it was lightweight, already in my possession, and the price was right.

This was not a small undertaking. A very basic easel can be thrown together in a weekend, something with more functionality can take much longer to build. I wanted my easel to be as adjustable as commercial models, and that would require fabricating lots of moving parts. For this kind of job I would recommend at least some woodworking experience and decent basic tools.

There are a lot of plans online available for easels. Ben Grosser's website was a good starting point. I used a lot of his ideas and made some changes of my own.

The type of easel I built is known as an H-frame easel because of its shape. The main frame was the first piece I put together.


The basic H-frame under construction


Complete.

The finished frame is loosely mated to a base, and supported from the rear. Two-piece rear support "buttresses" are hinged and adjustable, so that the frame's angle can be changed from vertical.


Each top support has a hole for a bolt, that can be loosened and slide along a channel routed into the bottom support.

Finally, the easel must have a top and bottom clamp to hold the artwork. The bottom clamp locks down against the frame with bolts, onto a piece on the other side. This slides a long a channel cut in the middle.


The bottom clamp, with a locknut.

The top clamp is the final addition to the easel. It also has a channel built in so that it can slide along the middle.


The top clamp viewed from the underside, showing the channel that allows it to slide along the middle.

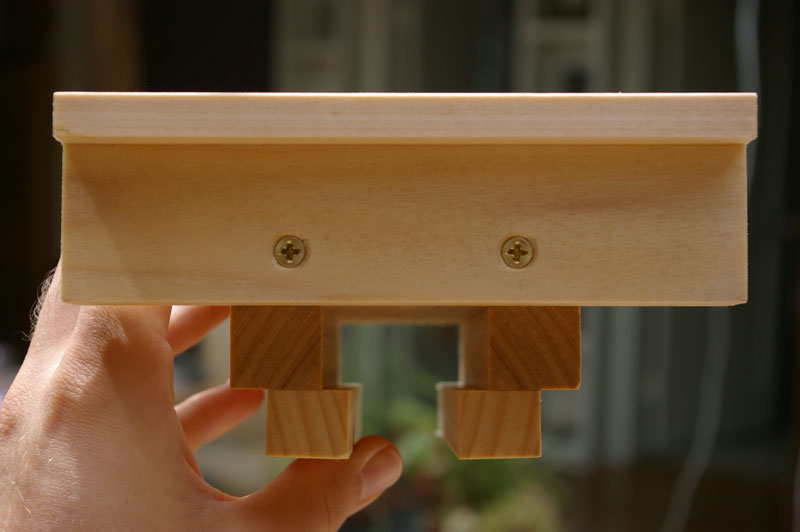
This clamp also has a threaded fitting, so that it can be locked in place once adjusted.


The finished easel, in the studio, ready to make art.


Friday, May 20, 2011

Tonalism, Revisited

I was pleasantly surprised to find a brand new book on Tonalism at my local library the other day. I am a bit of a fan of this style of artwork. While I was looking over this book, I was struck by something I had thought about before, why is it that some artists are households names, while others fade into obscurity?

In the case of the great masters, their fame is obvious: the genius of their work is easily observed by most people. There are some cases where an old master is lost or falls out of fashion. If an artist’s work has merit, they tend to be rediscovered at some point, even if it takes hundreds of years. These are not the kinds of artists I am thinking of.

The obscure artist tends to be unknown even to many art lovers, relegated to a mere footnote in some book. Their paintings are probably in the catalogs of small regional museums, lacking the clout to draw in the “big names” of art. Fans who visit these museums may discover that they are in storage and not on display. Obscure or unfashionable work is commonly sold off, often for firesale prices.

Obscure artists weren’t usually pioneers or innovators, merely participants in larger art movements. For this reason they tend to be ignored or dismissed as unoriginal. Even a relatively small art movement, such as Tonalism, had many of these followers. Their work can be inconsistent. I have chosen a few artists that caught my eye from the book:


Charles Warren Eaton, The Pine Grove


Charles Warren Eaton, River Landscape


Charles Warren Eaton, Winter Solitude


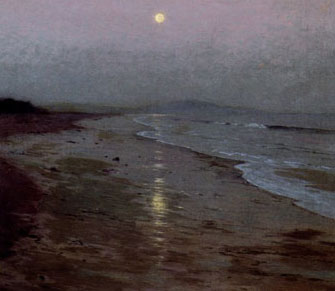
Lowell Birge Harrison, Moonrise on the Beach


Homer Dodge Martin, Wild Coast Newport


James Henry Moser, Fireworks Across the Potomac


John La Farge, Sea and Rocks Near Spouting Horn


Alexander Wyant, Pool on the Ausable

Tuesday, May 3, 2011

Sketch Class

I was recently told about a sketch class that was being held locally, once a week. Open to the public, one only had to pay a small fee to sttend.

For those of you not familiar, a "sketch class" is a chance for artists or anyone to get together and sketch a model in an impromptu set of poses. The poses vary in length, and are usually short, not being longer than a few hours. It is an excellent opportunity to hone one's skills, experiment with technique, and try to stay loose.

The first time I went, I was pleasantly surprised to find the overall level of the class to be very similar to what was offered in Florence. I havent done much figurative work for awhile, but familiar feelings arose almost immediately. The same general mistakes I used to make back in my art school years, resurfaced. I only had a few hours to work, so I had to try to correct these problems quickly and get a complete statement down on paper that was effective. It was an excellent challenge.

These sketches were mostly done in charcoal.


I even tried doing an oil sketch, painting directly on paper, coated with real gesso.


Monday, February 21, 2011

Making Panels Part II

Once the panels have been cut to final shape, they can be smoothed and prepared for gesso. I usually sand the panels with a moderate grit sandpaper, making sure that the edges are smooth.

The moisture in real gesso sometimes causes the wood grain to swell, the amount depending on the species. Because gesso is rigid, this can lead to cracking later on. To prevent this, the panels are rubbed down with alcohol, which raises the grain of the wood, Once dry the panels are given a final sanding.

Now I can start coating the panels.


First, the panel was given a few coats of size, made from hide glue. I used rabbit skin glue for this task. The glue was added to water in the correct ratio by weight, and allowed to sit over night. As you can see, it swelled considerably.

The glue was heated until all of the pellets have broken down into liquid. I continue to only use warm water in a sink to heat my glue, a glue pot being overkill. Once liquified, the glue is passed through a sieve, and its ready to be used.

The panels were given several coats of size, front back, and on the sides. The following day, gesso was applied

Real gesso is a mixture of hide glue and an inert white pigment, that is porous. The ground is absorbent, so it readily bonds the layers of paint to the panel, while at the same time isolating the two. There is more than one suitable choice for this material. I have chosen to use calcium carbonate, in the form of chalk. Chalk from the Champagne region of France is one of the most pure natural chalks that can be found.

I saved the leftover glue from sizing my panels, as a base for my gesso. The correct mixture involves adding chalk at 1.5 times this volume of glue.

First the glue must be made hot, then the chalk was slowly added. I stirred gently, taking care not to do so too vigorously. Stirring gesso too enthusiastically will introduce tiny air bubbles into the mixture. Once these bubbles are on the panel, they cannot be filled or removed, no matter how many additional coats of gesso are applied. Once all of the gesso was been added to the glue, it was allowed to soak in for ten minutes.


The panel are given a coat on each side, to seal them effectively. Its important to try to make the coats as even as possible. Gesso puts tension on the wood, and uneven tension could lead to problems later on. An equal number of coats front and back should minimize this stress.

After a coating of gesso is applied, the board was put aside to dry. This lasted twenty minutes to an hour. Then the next coat was be applied and so on. Coats should always be applied in overlapping passes, i.e. a coat across the width of the board should be followed by a lengthwise coat. Five to ten coats should be sufficient to get a good surface. It is possible to get carried away, and produce a beautifully smooth surface. That would require many extra coats, followed by lots of sanding.

Once all of the coats are applied and the panel is dry, there is one last step to prepare the panel. Raw gesso is very hard on brushes, and is too absorbent for oil paints. A final isolating layer needs to be applied to reduce this tendency. A thin layer of glue size is sufficient. Each panel should be given a week or two to dry, and then is ready to be used.

Friday, February 4, 2011

Making Panels

Over the next few weeks I plan on making an assortment of panels for painting. As discussed in my post on painting supports, panels have a variety of pros and cons. I have come to the conclusion that overall they are the best kind of support for works of small to moderate size. For larger works, I will still rely on canvas.

I recently located some furniture-grade, quarter sawn oak boards. These boards were kiln-dried, but had been aged 4-5 years. Oak was the most popular wood for use as a painting support in Northern Europe. It is a fine wood for use as a painting support, as a visit to any museum containing these pictures will demonstrate.


The boards were first cut to the right shape and size. Any final sanding or planing could be done at this time.


A larger panel necessitated joining more than one board together. The lap joint I cut into the boards is a traditional and effective method of joinery. Both halves are from the same board, but have been flipped so that if warpage does occur, there should be a counter effect.

Sunday, January 23, 2011

Still Life


Still Life, Objects
Oil on Canvas 9" x 12"
This painting is available. Contact me.

To inaugurate my new studio, I decided to paint a still life. I'm not really much of a still-life painter, but I thought it would be fun to follow a traditional formula. I wanted to see how a new "old" painting would look using the same pigments as the old masters.

The red in the apple is the newly finished Cinnabar. The jar was found by my grandfather underwater, it was very opaque and had a complex patina. I used Lapis lazuli, Azurite and Malachite to get the different shades. The lemon was a mix of Lead tin-yellow, and Naples yellow for the warmer areas of shadow.

Tuesday, January 11, 2011

Winter


Winter Stream
Oil on Canvas 10" x 8"
This painting is available. Contact me.